

Available Now
Concrete Driveway How-To- Guide
Leo Donovan • Oct 16, 2023

The Concrete Driveway How-To-Guide is a helpful resource with easy steps for building a strong and good-looking driveway. It covers everything from digging to keeping it in great shape.
· Concrete Durability: Concrete driveways can last up to 30 years or more with proper maintenance, making them a wise long-term investment.
· Energy Efficiency: Concrete's reflective properties can help lower energy bills by reducing heat absorption and maintaining cooler outdoor temperatures.
· Eco-Friendly Choice: Concrete often incorporates recycled materials, reducing its environmental impact during production.
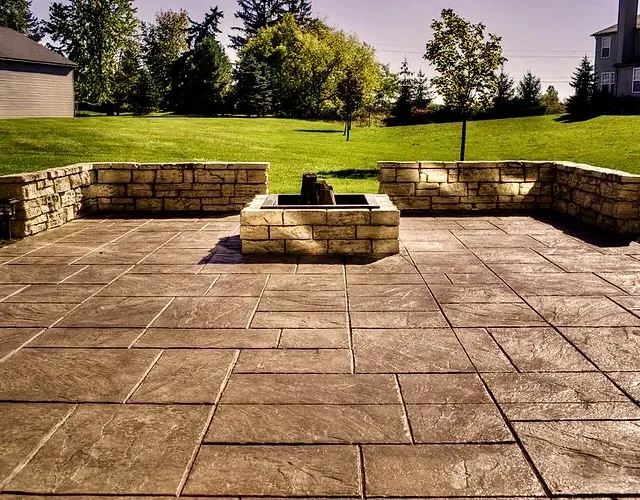
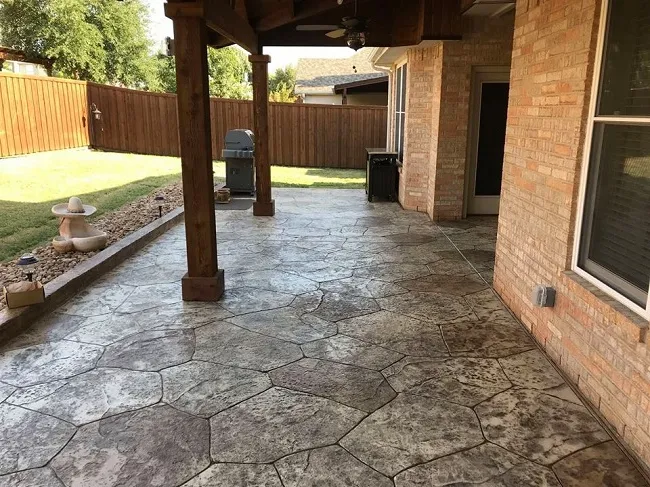
· Design Versatility: Customize your driveway with various colors, textures, and stamped patterns to match your aesthetic preferences.
· Property Value Boost: A well-maintained concrete driveway enhances curb appeal and can significantly increase your home's resale value.
Concrete driveways aren't just a functional part of your property; they're a statement of durability and elegance. If you're considering embarking on a journey to create your very own concrete driveway, you're in the right place. In this comprehensive guide, I will walk you through every step of the process, ensuring that even beginners can understand and follow along. Let's get started on crafting the perfect concrete driveway!
Introduction
A concrete driveway is more than just a path for your car; it's an essential element of your property's curb appeal and functionality. When done right, a concrete driveway can last for decades, adding value to your home and providing a smooth, durable surface for your vehicles. In this guide, I'll take you through the entire process of planning, preparing, pouring, and maintaining a concrete driveway. So, let's dive in!
Planning Your Concrete Driveway

Before you pick up a shovel or mix concrete, thorough planning is essential. Understanding the layout and dimensions of your driveway is crucial for a successful project.
Concrete Driveway Longevity: Concrete driveways can last up to 30 years or more with proper maintenance, making them a highly durable and long-term investment for homeowners.
Energy Efficiency: Concrete driveways can help lower energy bills as they reflect more sunlight than asphalt, reducing heat absorption and contributing to cooler outdoor temperatures.
Eco-Friendly Option: Concrete is an environmentally friendly choice as it often incorporates recycled materials like fly ash and slag, reducing the carbon footprint associated with its production.
Versatile Design Options: Concrete driveways offer a wide range of design possibilities, including various colors, textures, and stamped patterns, allowing homeowners to customize their driveway's appearance.
Enhanced Property Value: Installing a well-maintained concrete driveway can significantly boost the resale value of a home, making it an attractive feature for potential buyers.
Steps for Planning and Preparation
· Marking the Perimeter with Wooden Stakes: Start by marking the boundaries of your driveway using wooden stakes and string lines. This will help you visualize the shape and size of your future driveway.
· Adding Wooden Forms: Wooden forms or molds will shape your concrete. Place them along the marked perimeter, ensuring they are level and well-supported. These forms will hold the concrete in place during pouring and give your driveway its defined edges.
Excavating and Preparing the Ground

The foundation of your concrete driveway is as important as the concrete itself. Proper excavation and preparation ensure a solid base that prevents cracking and sinking.
Steps for Excavation and Ground Preparation
· Digging Out Topsoil: Start by removing the topsoil from the area within the wooden forms. You'll need to dig down to the desired depth for your driveway. This typically ranges from 4 to 6 inches but may vary based on your location and specific needs.
· Leveling the Driveway Sub-base: Once you've removed the topsoil, it's time to create a level and stable sub-base. This is typically done using gravel or crushed stone. Spread it evenly across the excavated area and compact it thoroughly. Aim for a sub-base thickness of about 4 inches.
Reinforcing the Concrete (Optional)
While not always necessary, reinforcing your concrete driveway can significantly enhance its strength and longevity. Consider adding rebar or wire mesh for added durability.
Pouring the Concrete
Pouring the concrete is a critical step that requires careful attention to detail.
Steps for Pouring Concrete
· Mixing the Concrete: Follow the manufacturer's instructions to mix the concrete. It should have a workable consistency, not too wet or dry. You can use a concrete mixer or mix it by hand in a wheelbarrow.
· Pouring the Concrete: Pour the mixed concrete evenly into the wooden forms. Having a helper can make this process smoother. Ensure that the concrete reaches all corners and edges of the forms.
· Screeding: Use a screed (a long, straight board) to level the concrete. Place it on top of the forms and move it back and forth in a sawing motion to create a smooth, level surface.
Flattening and Smoothing
A smooth finish is not just for aesthetics; it's crucial for the longevity of your driveway. Here's how to achieve it:
· Float and Trowel: After screeding, use a bull float to smooth the surface. Then, use a trowel to further flatten and smooth the concrete. Work systematically, and be sure to keep the surface level.
Can You DIY a Concrete Driveway?
One common question is whether a concrete driveway project is suitable for a DIY enthusiast. The answer is yes, but it's essential to assess your skills and be prepared for the work involved. If you're confident and have the necessary tools, it can be a rewarding DIY project.
Choosing the Right Base
Selecting the correct base layer for your concrete driveway is crucial for its durability. There are typically two options: a gravel base or a sand base. The choice depends on your location, soil type, and local climate.
Gravel Base: Suitable for areas with good drainage, gravel provides excellent support and helps prevent frost heaving in colder climates.
Sand Base: Sand is a more suitable option for areas with poor drainage. It provides a stable surface for the concrete and can help with drainage.
Essential Tips for a Problem-Free Concrete Driveway

Here are some essential tips to ensure your concrete driveway project goes off without a hitch:
· Weather Considerations: Avoid pouring concrete in extremely hot or cold weather, as extreme temperatures can affect curing.
· Proper Curing: Adequate curing is vital. Keep the concrete moist and covered for at least three days after pouring to prevent cracking.
· Sealing: Consider applying a quality concrete sealer to protect your driveway from stains and moisture penetration.
· Regular Maintenance: Clean your driveway regularly and address any cracks promptly to prevent them from spreading.
Maintaining Your Concrete Driveway
Maintaining your concrete driveway is essential for its longevity and appearance. Here are some tips:
· Cleaning: Regularly sweep or pressure wash your driveway to remove dirt and debris.
· Sealing: Reapply a concrete sealer every few years to maintain its protective properties.
· Crack Repair: Address any cracks promptly with concrete crack filler to prevent them from worsening.
Conclusion
Creating a concrete driveway is a rewarding project that enhances both the aesthetics and functionality of your property. With proper planning, preparation, and attention to detail, you can achieve a beautiful and long-lasting concrete driveway that adds value to your home. Remember, patience is key, and if you're unsure about any step, consider consulting with a professional.
Additional Resources and References
In your quest to master the art of concrete driveways, we've compiled a treasure trove of expert resources and references. Explore these trusted sources to enhance your knowledge and DIY prowess.
https://www.richfieldconcrete.com/concrete-driveway-benefits/#:~:text=It's
https://www.copesandgravel.com/how-to-build-concrete-driveway.html
FAQs
FAQ 1: How long does it take for a concrete driveway to cure?
The curing time for a concrete driveway can vary depending on several factors, including weather conditions and the specific concrete mix used. Generally, you should keep the concrete moist and covered for at least three days to allow it to cure properly. However, full curing can take up to 28 days.
FAQ 2: What tools and materials are needed for a DIY concrete driveway?
For a DIY concrete driveway project, you'll need essential tools such as a wheelbarrow, shovel, trowel, edger, bull float, and wooden forms. Additionally, you'll require materials like concrete mix, gravel or sand for the sub-base, and optional reinforcement materials like rebar or wire mesh.
FAQ 3: Can you pour a concrete driveway in cold weather?
While it's possible to pour concrete in cold weather, it requires additional precautions and may take longer to cure. Cold weather can slow down the curing process, so it's essential to use cold-weather concrete mixes, employ proper insulation and heating methods, and monitor the temperature closely during curing.
FAQ 4: Are there different types of finishes for concrete driveways?
Yes, concrete driveways offer a variety of finishes, including broom finish, exposed aggregate, stamped patterns, and more. The choice of finish depends on your aesthetic preferences and the level of slip resistance you desire for your driveway.
FAQ 5: How do you prevent cracks in a concrete driveway?
To prevent cracks in a concrete driveway, ensure proper sub-base preparation, use reinforcement materials if necessary, avoid overworking the concrete during finishing, and control joint placement. Regular maintenance, including sealing and crack repair, is also essential to prolong the life of your driveway.
GET IN TOUCH
Need more information? Speak to one of our experts and get personalised advice on your project to bring your vision to life. Contact us today to schedule your consultation or request a free consultation.
Contact Us
Stamped concrete is an excellent home addition because it's affordable, durable, and stylish. Mimicking pricier materials, it boosts curb appeal and home value. Versatile in design, it suits both indoor and outdoor spaces, making it a smart choice for homeowners seeking an attractive and budget-friendly upgrade. · Affordable Elegance: Stamped concrete offers a budget-friendly alternative for achieving the luxurious look of more expensive materials, making it an affordable and stylish choice for homeowners. · Versatility Unleashed: From mimicking expensive materials to intricate custom designs, stamped concrete's versatility knows no bounds, seamlessly blending with both indoor and outdoor spaces. · Durability with Style: Combining durability with aesthetic appeal, stamped concrete withstands various weather conditions and requires minimal maintenance, ensuring a long-lasting and visually pleasing investment. · Increased Home Value: Studies show that well-designed stamped concrete installations contribute significantly to the increase in home value, making it a wise financial decision for homeowners. · Commercial and Residential Appeal: Stamped concrete isn't limited to homes; commercial establishments leverage its durability, design versatility, and cost-effectiveness for flooring and outdoor spaces, emphasizing its broad appeal. Introduction Stamped concrete, a versatile and budget-friendly addition to homes, goes beyond the ordinary to offer an array of benefits. In this comprehensive guide, we'll delve into the world of stamped concrete, exploring its definition, the process of creation, and the numerous advantages it brings to the table. Whether you're a seasoned homeowner or just starting your journey in home improvement, this guide is tailored to help you understand why stamped concrete is a fantastic addition to any home. For professional guidance in turning this understanding into reality for your home, consider consulting experts like https://toowoombaconcreters.net.au/ .
Decorative concrete in homes is a game-changer. It boosts property value, lets you pick cool designs, works indoors and outdoors, and is kind to the planet. Plus, it sticks around, making it a solid investment for a stylish and eco-friendly home. · Enhanced Property Value: Decorative concrete can add up to 10% or more to a home's overall value, making it a lucrative investment in the long run. · Customization for All Tastes: With vast options in colors, patterns, and textures, homeowners can tailor decorative concrete to match their unique style, enhancing appeal. · Indoor and Outdoor Versatility: Beyond driveways and patios, decorative concrete can elevate interior spaces, offering a seamless flow of elegance throughout the home. · Eco-Friendly Practices: Some decorative concrete options, like stained concrete, reduce the need for demolition and new materials, contributing to a sustainable choice for environmentally conscious homeowners. · Long-Term Value: Properly maintained decorative concrete surfaces can maintain their appeal and functionality for decades, offering a lasting return on investment compared to other home improvement projects. Introduction Decorative concrete, once relegated to sidewalks and driveways, has become a rising star in the realm of residential projects. Its transformative power goes beyond functionality, enhancing both the aesthetics and livability of homes. In this comprehensive guide, we'll delve into the multifaceted benefits of decorative concrete, catering to beginners and seasoned homeowners alike. If you're looking for expert assistance in bringing these benefits to life for your home, consider reaching out to professionals like https://townsvilleconcretingcompany.com.au/

Replacing a concrete driveway usually costs between $4 and $7 per square foot. The exact price depends on the size, design, and where you live. To find out the cost for your driveway, measure it and get quotes from local contractors. · Replacing a concrete driveway is a long-lasting investment that enhances functionality, curb appeal, and property value. · Factors influencing replacement cost include driveway size, type of concrete, design complexity, labor costs, and additional features. · The national average cost per square foot for a basic concrete driveway installation ranges from $4 to $7. · Various types of concrete driveways offer options for customization, from plain concrete to decorative finishes. · Consider factors like the driveway's condition, age, budget, and future plans when deciding if replacement is necessary. Hiring professionals ensures a successful project. Concrete driveways may not always be the first thing on a homeowner's mind, but they play a significant role in the overall appearance and functionality of your property. If you've ever considered upgrading or replacing your driveway, you might have come across various options, one of the most durable and cost-effective being concrete. Delving into the world of concrete driveways , this guide will specifically focus on the cost of replacement. Whether you're a beginner or a seasoned homeowner, we'll walk you through everything you need to know about budgeting for a new concrete driveway.
Call Now For a Fast & Free Quote
We can be contacted 24/7 via email or telephone
Location
City Council of Ballarat and Surrounding Areas
Call

Ballarat's Best Concreters since 2010.
This is a referral website, please visit our Privacy Policy for more information.
Navigation
Services
Working hours
- Mon - Sun
- -
Give us a call and if we cannot get to you straight away, one of our specialist will call you back shortly.
New Paragraph